Jumat, 05 Februari 2021

Windows 10 20H2 October 2020 Update Upgrade via MDT


 Due to some PC still windows 7 and need upgrade to windows 10, i use windows creation tools and update via online and its need more time, after search the solution for offline ways to Upgrade,  i found the article from www.nextofwindows.com, so i re post on my blog to remember it again, and letter will try bellow step for Offline Upgrade .

MDT, short for Microsoft Deployment Toolkit, is a wonderful imaging deployment tool Microsoft offers to those who don’t have the full-blown System Center Configuration Manager. It’s free and it works great. If you are using it, here is a quick instruction on how to prepare the new released 20H2 image for MDT to upgrade Windows 10 to October 2020 Update

Windows 1903 600x338 - Windows 10 20H2 October 2020 Update Upgrade via MDT

Usually, preparing a new OS image in MDT is pretty straightforward but since the downloaded version of ISO only has a install.esd which includes all versions of Windows 10 edition we need to a bit more work to get it ready.

1. Download 20H2 ISO image

Download and run the Windows 10 Media Creation Tool to create the installation media in ISO format.

image 17 600x474 - Windows 10 20H2 October 2020 Update Upgrade via MDT

2. Extract files

Right-click the ISO file we just downloaded, and choose Mount to mount the image into a local drive.

image 19 - Windows 10 20H2 October 2020 Update Upgrade via MDT

Now let’s make a copy of mounted drive to a folder. For me, I copied the whole drive into a Software folder on my computer.

image 20 - Windows 10 20H2 October 2020 Update Upgrade via MDT

3. Create install.wim from install.esd

Open an elevated Command Prompt window and run the DISM command to locate the right image to convert first.

DISM /Get-WimInfo /WimFile:sources\install.esd
image 21 600x399 - Windows 10 20H2 October 2020 Update Upgrade via MDT

Since I am preparing for the Pro version, index 6 is what I needed. Now run the following to create the install.wim file.

DISM /Export-Image /SourceImageFile:sources\install.esd /SourceIndex:6 /DestinationImageFile:sources\install.wim /compress:max /CheckIntegrity
image 22 600x158 - Windows 10 20H2 October 2020 Update Upgrade via MDT

This created the install.wim file in the same folder as install.esd.

4. MDT Setup 1 – Add Image

Now let’s open Deployment Workbench (MDT Console), right-click Operating System and choose Import Operating System.

image 18 600x335 - Windows 10 20H2 October 2020 Update Upgrade via MDT

Select the entire image folder that contains the install.wim file we just managed to create. Check the Move the files option if needed.

image 24 600x501 - Windows 10 20H2 October 2020 Update Upgrade via MDT

Given a unique name for the image, and done for the import.

5. MDT Set up 2 – A New Task Sequence

Right-click Task Sequences and choose New Task Sequence.

image 25 600x344 - Windows 10 20H2 October 2020 Update Upgrade via MDT

Put in a unique Task sequence ID, Name and some description if needed.

image 17 600x373 - Windows 10 20H2 October 2020 Update Upgrade via MDT

Then, select Standard Client Upgrade Task Sequence as the selected Template.

image 27 600x501 - Windows 10 20H2 October 2020 Update Upgrade via MDT

Pick the Operating System image we just imported.

image 18 600x319 - Windows 10 20H2 October 2020 Update Upgrade via MDT

Go through the rest of the steps and provide a local admin password when prompted. And that’s it for creating a new upgrade task sequence.

6. Client Upgrade

Now in a workstation that needs to upgrade, go to the shared deployment location and run LiteTouch.vbs from the scripts folder.

\computername\deploymentshare$\scripts
image 19 600x276 - Windows 10 20H2 October 2020 Update Upgrade via MDT

Select the 20H2 Upgrade option and go through the reset without changing anything. If you have any applications that you’d like to update the same time, you can choose them from the Applications section. Click Begin to start.

image 31 600x274 - Windows 10 20H2 October 2020 Update Upgrade via MDT

During the upgrade, you can monitor the process from the Monitoring tab in the MDT console if you like.

image 33 600x187 - Windows 10 20H2 October 2020 Update Upgrade via MDT

And that’s about it. Personally, for feature updates like 1903 and 20H2, I’d prefer upgrading through MDT than WSUS. Yes, it takes a few more steps to get prepared but once everything is in place, the upgrade process is much smoother and faster.

A Quick Way to Open Computer Management On a Remote Computer

Just COPAS from www.nextofwindows.com

I do open Computer Management console on a remote computer quite often and wish I knew this simple trick years ago, which would have saved me tons of time.

Here is what I normally do:

Right-click the Start menu and choose Computer Management. Then go to Action and click Connect to another computer…, type in the computer name and connect.

image - A Quick Way to Open Computer Management On a Remote Computer

Quite tedious and time-consuming.

Now here is a much faster way:

Create a new file called mg.cmd with the following one-liner and save it in your default %windir% folder.

start compmgmt.msc /computer=%1

Now, whenever you need to open Computer Management console on a remote computer, simply press Win+R and type

mg computername

That’s much easier and a slick way to open a MMC console connected to a remote computer.

Cara Reset License Subscription Autodesk Pada Windows

Berhubung memang kebutuhan kantor dimana AutoCad yang digunakan ada 2 versi, antara License Server dan Single sign in User jadi bbrp user yang tidak kebagian di License Server saya alihkan ke Single Sign in User, Alhamdulillah team support memebrikan link blog nya untuk panduan remove License server dan diganti ke Single sign in User, dan berikut step yang saya COPAS dari cstc.ciptasatria.com

I. Autodesk Versi 2020 keatas

1)  Matikan AdSSO services jika running

  • Windows Task Manager > pilih Details > AdSSO.exe > klik End Task

2)  Hapus file Login.State.xml

  • C:\Users\<username>\AppData\Local\Autodesk\Web Services dan hapus file LoginState.xml

3)  Buka software Autodesk dan aktivasi license kembali.


II. Autodesk Versi 2019, 2018, dan 2017

1) Hapus folder ADUT

  • C:\Users\<username>\AppData\Roaming\Autodesk\ADUT dan hapus folder ADUT

ADUT

2)  Hapus file adskflex

  • C:\ProgramData\FLEXnet dan hapus semua file adskflex

adskflex file

3)  Hapus folder Product Key

  • C:\ProgramData\Autodesk\CLM\LGS dan hapus folder Product Key yang ingin di reset licensenya

Product Key: https://knowledge.autodesk.com/customer-service/download-install/activate/find-serial-number-product-key/product-key-look

LGS folder

4)  Hapus file LoginState.xml

  • C:\Users\<username>\AppData\Local\Autodesk\Web Services dan hapus file LoginState.xml

LoginState.xml

5)  Buka software Autodesk dan aktivasi license kembali


III. Autodesk Versi 2016 kebawah

1)  Uninstall software Autodesk

2) Hapus folder ADUT

  • C:\Users\<username>\AppData\Roaming\Autodesk\ADUT dan hapus folder ADUT

3)  Sign-in ke Autodesk Account dan download software Autodesk

4)  Setelah selesai proses install, kemudian aktivasi license kembali

Posted by

Rabu, 11 Maret 2020

How to Download and Setup MS Office 2019

Due to New on installing and download MS Office 2019, i try to find the way and was get from www.techsoup.org, so i copied the step to my web, if someday i forgot
With Office 2019, Microsoft has changed the way Volume Licensing customers can download and install all Office suites and individual applications, including Visio and Project. Unlike previous editions of Office that were obtained through Volume Licensing, Office 2019 products can't be downloaded directly through the Volume Licensing Service Center (VLSC).
If you've already requested an Office 2019 product through TechSoup and received an email from the VLSC notifying you that your license agreement is ready to be accepted, you can use these instructions to obtain your product. If you need help upgrading to Office 2019, you can get low-cost installation support from TechSoup.
Follow the instructions for the operating system you'll be using.

Windows Download and Installation Instructions for Office 2019

Beginning with Office 2019, all Office products for Windows that are available through Volume Licensing use Click-to-Run technology instead of the traditional Windows Installer technology. To deploy volume licensed versions of Office 2019 products for users in your organization, you'll use the Office Deployment Tool (ODT).
You'll need a broadband Internet connection with download speeds of at least 20 Mbps to download Office 2019 products. Note that Office 2019 products require Windows 10 and will not run on older versions of Windows.

Step One: Register at the VLSC and Accept Your Software Agreement

If you haven't already, register at the VLSC and accept your software license agreement for the Office 2019 products you requested by completing only steps one and two in our VLSC quick-start guide.

Step Two: Get Your Office 2019 Product Key from the VLSC

  1. Sign in to the VLSC.
  2. Select the Downloads and Keys tab.
  3. Find your Office 2019 product in the list and click its Key link.
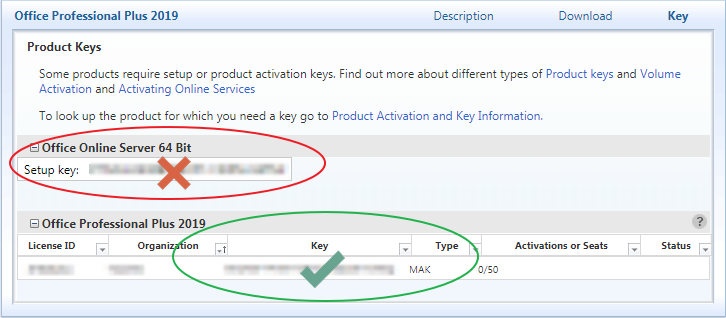
  4. In the table beneath the name of the product, find your product key in the column labeled Key. The Type column for this key should say MAK, not KMS.
    • Office suites have separate setup keys for online functionality like web apps. These keys are not the same as the MAK product keys and cannot be used for volume activation of desktop products.
      VLSC interface with Key column highlighted.
  5. Copy the product's individual key from this table and paste it into a program like Notepad or click Export all keys: CSV just above the list of products to download a list of keys in comma-separated-values format (which can be opened with Excel). This list contains all Volume License keys associated with agreements in your VLSC profile.

Step Three: Download the Office Deployment Tool (ODT)

  1. Download the Office Deployment Tool from Microsoft.
  2. When the download is finished, open it, check the box to accept the Microsoft license terms, and click Continue.
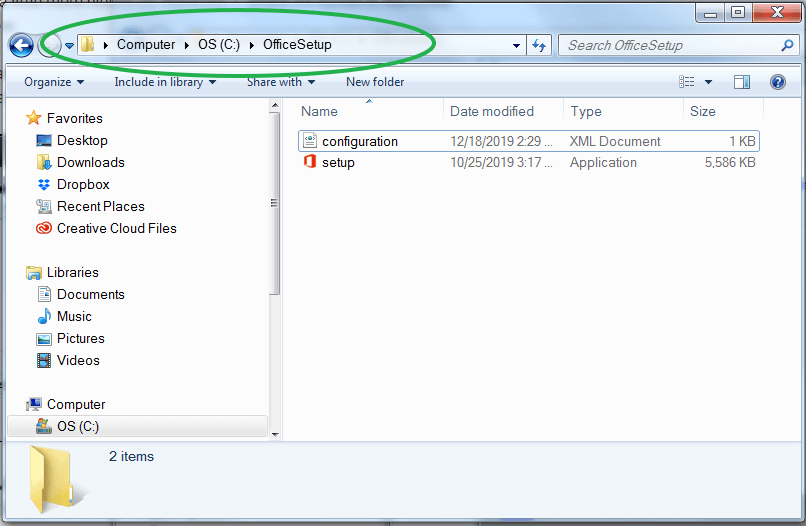
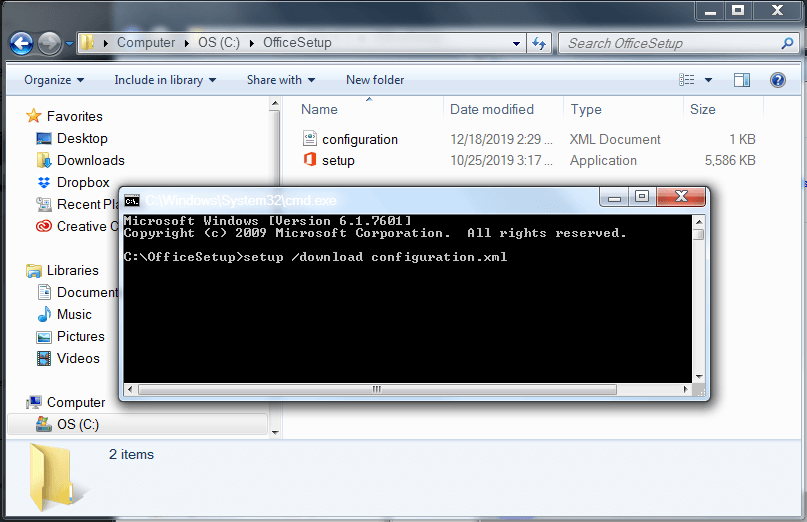
  3. You will be asked to choose a folder to store the extracted setup files. Navigate to the root level of your computer's hard drive (C:) and click Make New Folder. Then, name the folder "OfficeSetup" and continue with the extraction process. Note that these instructions won't work if you choose a different folder name or location.
    Office Deployment Tool interface with new folder created
  4. When you are finished, your new "OfficeSetup" folder should have a file named "setup" and some sample "configuration" files. Delete the configuration files. You only need to keep the setup file.

Step Four: Download and Prepare the Configuration File

Download the configuration file that you need from the table below by right-clicking the link for the file you need, selecting Save link as…, and saving the file to the "OfficeSetup" folder you created. Don't download more than one of these files to that folder at a time. If you need to install more than one type of Office product, you'll have the opportunity to do so later.
Next, follow the instructions below to add the product key that you obtained from the VLSC in step two to the configuration file.
  1. Right-click the configuration file and select Edit to open the file in Notepad.
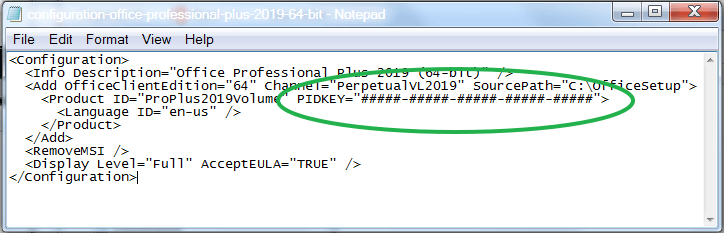
  2. Look for the following string of text in the configuration file:
    • PIDKEY="#####-#####-#####-#####-#####"
      configuration file open in Notepad with PIDKEY highlighted
  3. In this string, replace #####-#####-#####-#####-##### with your MAK client activation key by copying and pasting the key from wherever you saved it. You should leave the quotation marks before and after the key.
  4. Save the file and close it.
  5. Then, right-click the configuration file, select Rename, and change the filename to be "configuration".
    • If the configuration file you downloaded has a name that ends with ".xml", that means your installation of Windows has been set to display file extensions. If this is the case, make sure to keep ".xml" in your filename by renaming it as "configuration.xml" instead of "configuration".
If you need additional customization for your deployment and have IT experience, you can use Microsoft's Office Customization Toolto create your own configuration files.

Step Five: Download and Install Your Product

Note that all earlier versions of Office will be uninstalled when you install Office 2019 products, so be sure to save and quit any Office applications that are running.
  1. Navigate to your "OfficeSetup" folder in File Explorer.
  2. You'll need to perform the next steps using the Command Prompt, which is a text-based command-line interface that runs within Windows.
    To open the Command Prompt
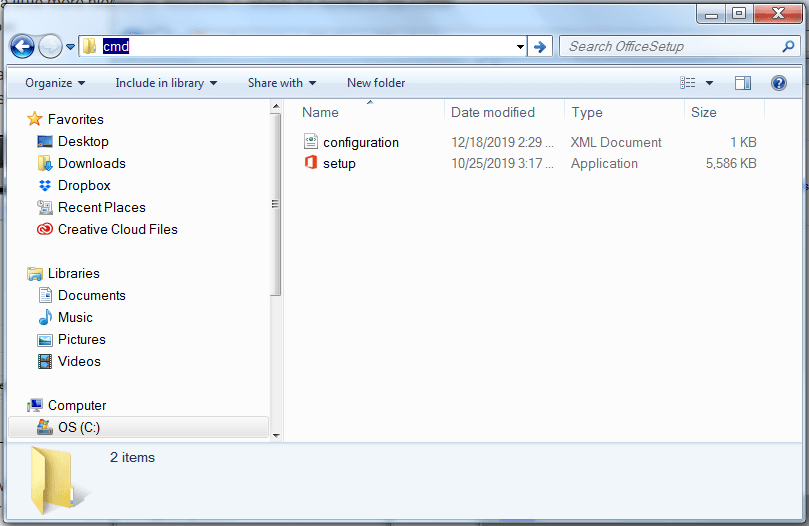
    1. Click the address bar in the File Explorer window that you opened.
      File Explorer window with address bar highlighted
    2. With the address bar selected, type cmd and press Enter.
      File Explorer window with text entered in address bar
  3. Type the following into the Command Prompt that you opened.
    • setup /download configuration.xml
      Command prompt window with text entered
    It will look as if nothing is happening, but your product will be downloading in the background. The download will be a large file and might take a while to finish. Once the download is complete, you will be returned to the Command Prompt.
  4. When the download has finished, you're ready to install the product. Type the following into the Command Prompt.
    • setup /configure configuration.xml
    If you see an error that says you still have previous versions of Office installed on your computer, you'll need to manually uninstall those programs and type the above command again.
  5. When your installation is complete, you'll be returned to the Command Prompt. Close the Command Prompt and return to the desktop. Your Office 2019 product will be installed and ready to use.
  6. If you need to install a different Office product, delete the "configuration.xml" file from the "OfficeSetup" folder and follow these instructions again beginning at Step Four: Download and Prepare the Configuration File.
If you need to customize your installation or need more detailed instructions, you can refer to Microsoft's Office 2019 deployment guide for IT professionals.

macOS Download and Installation Instructions for Office 2019

With Office 2019 products for Mac, you can't download the Office installation files directly from the VLSC. Instead, you'll download an activation tool called the Volume License (VL) Serializer from the VLSC and then separately download the Office installation files from Microsoft through the Office Content Delivery Network (CDN).
The instructions for performing all these steps are provided in the VLSC under the Downloads and Keys tab for each Office 2019 product for Mac. We're including those same instructions here with more details for organizations that need more assistance.

Step One: Register at the VLSC and Accept Your Software Agreement

If you haven't already, register at the VLSC and accept your software license agreement for the Office 2019 products you requested by completing only steps one and two in our VLSC quick-start guide.

Step Two: Download and Install the Volume License Serializer

  1. Sign in to the VLSC.
  2. Select the Downloads and Keys tab.
  3. Find your Office 2019 for Mac product in the list and click its Download link.
  4. Change the Download Method to "Web Browser" instead of "Download Manager" and click the Continue button at the bottom of the window.
  5. Click the download icon (circle with a downward arrow) to download the Volume License Serializer .iso file.
  6. Once the download is complete, open the .iso file to extract the Volume License Serializer package file.
  7. Run the Volume License Serializer package file on each computer that you'll be installing a volume licensed Office 2019 for Mac product on.
If you requested more than one kind of Office 2019 for Mac product, you'll repeat this process for each product.
We suggest running the Volume License Serializer before you install your Office 2019 for Mac products in the next step, but you can also run the serializer afterward if you prefer.

Step Three: Download and Install Your Products

The download links to obtain your Office 2019 for Mac products from the Office CDN should be included in the text instructions that appear when you click the Download link for each product in the VLSC.
However, you can also find the download links for the Office 2019 suite and individual applications directly from Microsoft.
For the Office for Mac 2019 suite, you can choose whether you want the download to include Microsoft Teams (Microsoft's communications platform) or not. After you've downloaded the installation package, open it and follow the instructions to install your product.
If you need to customize your installation or need more detailed instructions, you can refer to Microsoft's Office for Mac deployment guide for IT professionals.

Senin, 13 Januari 2020

Multiple OS USB disk

Gegara sering Install ulang OS karena Lemot, yo wis ta buat ae...dalam 1 usb Flashdisk dapet nyomot dari www.winsetupfromusb.com dan boleh sedot untuk softwarenya di WinSetupFromUSB 1.9.exe

Here is how to quickly add multiple Windows NT6/10 (Vista, 7, 8, 10, Server 2008/2012 etc.) sources and Ubuntu with persistence space to a USB disk.

1) If using the program for first time on this USB disk, select the auto-format option. Use FAT32 if you’d need to boot in UEFI mode.


2) Select the first NT6 source, it is expected as in ISO image file, here is an example with Windows 7 x64:


3) (Optional) In advanced options you could change folder and boot menu name, make Q-Dir File Explorer launch before start of Setup and add a folder with custom boot critical drivers to be loaded. The latter could be useful to load custom USB 3.0 drivers or SATA/AHCI/RAID ones.
For non-boot critical drivers, such as Wireless/WLan, LAN, Video or Sound drivers, a good idea is to use SAD (Stand Alone Driverpack utility), a proven and reliable solution from the DriverPacks team. More details about these options can be found in the FAQs.


4) (Optional) Add Ubuntu 14.04 Desktop with its own persistence space:


5) Press GO to start the process:


6) If the auto format option was selected, please do read carefully which disk is going to be reformatted, all data is going to be wiped out, the click OK on both dialogue boxes:


7) You can watch detailed progress of what is happening by selecting the Show Log option:


In a few minutes you will see Job Done message, the first two source have been transferred:


8) Now lets add another NT6 source, it would be Windows 8 Enterprise Eval x64, in the very same way as the first one. To preserve contents of the USB disk, make sure the auto-format option is not checked. Press GO and wait until process completes.:


9) Lets add yet another NT6 source, this time Server 2008 R2 x64, sequence is exactly as before:


10) Here is the boot menu once the system was booted from this USB disk:


11) To get persistence in Ubuntu, when the Live CD menu gets displayed hit the key to enter “Other Options”. This will display the arguments that the Live CD passes to the kernel. At the end of this argument list just add a space and add the word “persistent”. This will instruct the Live CD to maintain and use persistence.