Senin, 13 Januari 2020

Multiple OS USB disk

Gegara sering Install ulang OS karena Lemot, yo wis ta buat ae...dalam 1 usb Flashdisk dapet nyomot dari www.winsetupfromusb.com dan boleh sedot untuk softwarenya di WinSetupFromUSB 1.9.exe

Here is how to quickly add multiple Windows NT6/10 (Vista, 7, 8, 10, Server 2008/2012 etc.) sources and Ubuntu with persistence space to a USB disk.

1) If using the program for first time on this USB disk, select the auto-format option. Use FAT32 if you’d need to boot in UEFI mode.


2) Select the first NT6 source, it is expected as in ISO image file, here is an example with Windows 7 x64:


3) (Optional) In advanced options you could change folder and boot menu name, make Q-Dir File Explorer launch before start of Setup and add a folder with custom boot critical drivers to be loaded. The latter could be useful to load custom USB 3.0 drivers or SATA/AHCI/RAID ones.
For non-boot critical drivers, such as Wireless/WLan, LAN, Video or Sound drivers, a good idea is to use SAD (Stand Alone Driverpack utility), a proven and reliable solution from the DriverPacks team. More details about these options can be found in the FAQs.


4) (Optional) Add Ubuntu 14.04 Desktop with its own persistence space:


5) Press GO to start the process:


6) If the auto format option was selected, please do read carefully which disk is going to be reformatted, all data is going to be wiped out, the click OK on both dialogue boxes:


7) You can watch detailed progress of what is happening by selecting the Show Log option:


In a few minutes you will see Job Done message, the first two source have been transferred:


8) Now lets add another NT6 source, it would be Windows 8 Enterprise Eval x64, in the very same way as the first one. To preserve contents of the USB disk, make sure the auto-format option is not checked. Press GO and wait until process completes.:


9) Lets add yet another NT6 source, this time Server 2008 R2 x64, sequence is exactly as before:


10) Here is the boot menu once the system was booted from this USB disk:


11) To get persistence in Ubuntu, when the Live CD menu gets displayed hit the key to enter “Other Options”. This will display the arguments that the Live CD passes to the kernel. At the end of this argument list just add a space and add the word “persistent”. This will instruct the Live CD to maintain and use persistence.

Minggu, 12 Januari 2020

Bootable flasdisk for Windows 10

Berhubung DVD Windows 10 di pinjam team lain, yo wis ta buat bootable nya via Flasdisk Alhamdulillah dapat dari tenikit.com.. matur suwun.
Berikut adalah langkah langkah membuat bootable USB flashdisk Windows 10 :
1. Siapkan dulu file ISO Windows 10 dan juga flashdisk berukuran minimal 4GB untuk Windows 10 32bit atau flashdisk 8GB untuk Windows 10 64bit. Jika anda belum memiliki ISO Windows 10 bisa anda download lewat link >> https://teknikit.com/2016/05/cara-mudah-download-file-iso-windows-10-dari-microsoft.html
2. Download dahulu software Rufus di sini >> https://rufus.akeo.ie/. Pilih yang Rufus portable, jadi anda bisa menjalankannya tanpa install di komputer. Anda bisa menjalankannya di komputer manapun termasuk di warnet juga bisa.
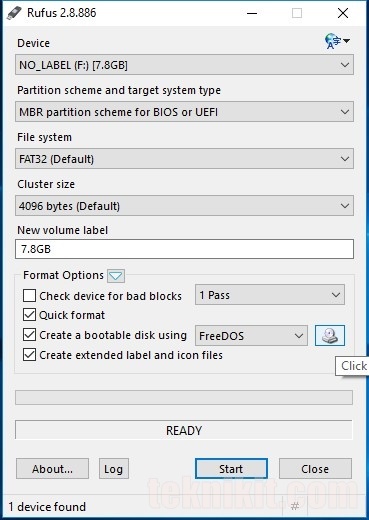
3. Jalankan Rufus, tampilan utama Rufus adalah seperti berikut
Software Rufus Untuk Membuat Bootable Flashdisk
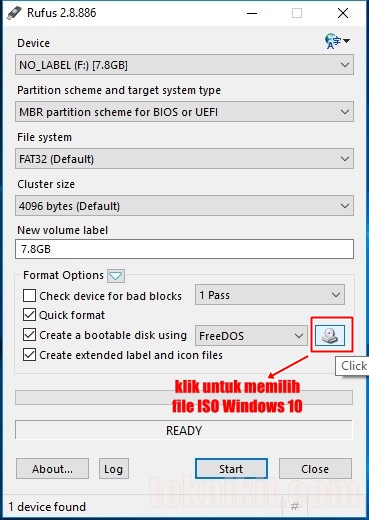
4. Klik pada logo disk seperti gambar di bawah kemudian pilih file ISO Windows 10
Memilih File ISO Windows 10 Untuk Bootable
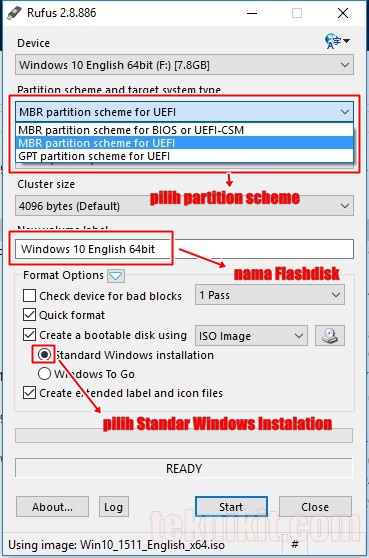
5. Setelah file ISO Windows 10 termuat, kini kita tentukan Partition scheme and target system type. Ini yang penting karena kalau salah pilih maka flashdisk anda tidak akan terbaca di komputer saat akan install Windows.
Membuat Bootable Flashdisk Windows 10
6. Begini tipsnya. Anda harus tahu tipe boot mode apa yang akan anda pakai untuk install Windows 10 nantinya. Untuk lebih jelasnya bisa anda baca sedikit penjelasan pada artikel sebelumnya >> https://teknikit.com/2016/05/mengatasi-masalah-tidak-bisa-install-windows-10.html. Pada gambar di atas ada 3 pilihan Partition scheme, anda fokus pada pilihan pertama dan ketiga saja. Jika anda mau install Windows 10 pada UEFI mode dan GPT partition, maka pilih GPT partition scheme for UEFI. Namun jika anda mau install Windows 10 pada Legacy mode dan MBR partition, maka anda pilih MBR partition scheme for BIOS or UEFI-CSM.
7. Setelah ini anda beri nama flashdisk sesuai keinginan, misal Windows 10 English 64bit. Dan terakhir pilih Standard Windows Installation.
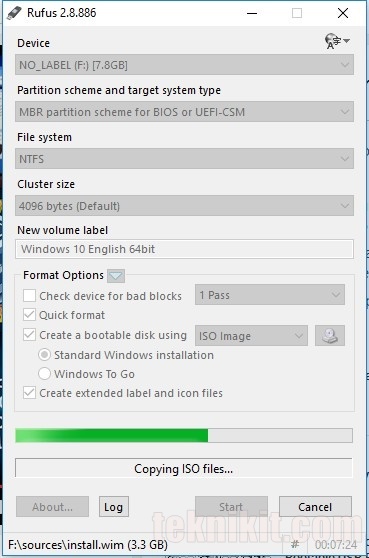
8. Klik Start untuk memulai proses membuat bootable USB flashdisk Windows 10. Tunggu hingga proses selesai.
Proses Membuat Bootable USB Flashdisk Windows 10
9. Jika proses pembuatan bootable flasdisk Windows 10 menggunakan Rufus sudah selesai, berarti anda bisa tutup Rufus dan gunakan flashdisk anda untuk install Windows 10 pada laptop/ PC anda.