Senin, 03 Oktober 2011

FreeNas sebagai Server Backup


Sekitar 3 minggu yang lalu..dapat info mengeni FreeNAS dari kang Lucky kawan loma di cianjur, lalu saya coba oprek dan ternyata viturnya bagus, salah satunya untuk di buat sebagai backup server dimana menggunakan system sycronize via network antara PC server FREENAS dengan Client . Di FreeNAS Sendiri menggunakan vitur Rsync dan di sisi client menggunakan aplikasi atau software Deltacopy. untuk syncronisasi awal membutuhkan waktu yang lumayan lama tergantung dari berapa banyak file yang akan di backup disisi client yang akan di sycron kan dengan FreeNAS, setelah semua file berada di Freenas maka hasilnya seperti pinang di belah kampak…eh sorry ..maksudnya pinang di belah dua…hasilnya akan mirip seperti file yang ada pc client. Kenapa saya mencoba untuk memilih FreeNas …Karena selain ringan dan absolutly gratis both of freenas or deltacopy serta gampang di konfigurasi, freenas hanya membutuhkan spesifikasi hardware yang lumayan kecil, min P2, ram 128, dan hardisk 1 gb sudah bisa jalan bahkan via thumdrive atau cd juga bisa running karena hanya membutuhkn resourch sekitar 400mb, nah untuk penyimpanan backupnya kita bisa menggunakan hardisk tambahan sesuai dengan berapa besar data backup yang akan kita simpan. Dan yang jelas semakin besar spesifikasi hardwarenya otomatis performa nya semakin bagus. Kebetulan saya sendiri menggunakan PC P4, Ram 512 dan hardisk 40 Gb dimana yang di gunakan untuk partisi systemnya 700mb saya lebihkan dari yang diminta untuk penginstalan system, dan sisanya saya mount untuk penyimpanan backup data, walhasil setelah 2 minggu ngoprek, data yang ada di client, saya ambil contoh 3 client, dan synchronize data berjalan lancer antara pc client1, ftp server + sharing file(windows server 2003) dan FreeNas dimana pc client 3, selain data kerjaan saya juga setting backup file email outlooknya agar ke backup juga ,intinya pc tersebut ada dua folder yang saya backup, satu folder semua data kerjaan yang berhubungan dengan client tersebut dan satu folder file emailnya (pst file di outlook) dan sycnconize pun berjalan lancar. Nah untuk backup server Freenas sendiri rencana saya mau menggunakan Hardisk Dock buatan Nexstar, berhubung masih buka PR nya ya nuggu dah…tulisan nya berlanjut…nanti klo sudah semua saya implementkan …postingan berikutnya akan saya tulis secara detail…dari instalasi wal sampai confogurasinya…


dari http://www.freenas.org/ dan beberapa blog lainnya yang lupa saya catat waktu searching mengenai Freenas ini
Rabu, 24 Agustus 2011

Setup Printer Fuji Xeroc DC 400 on Windows 7

Almost 2 week setting up the printer network for model Fuji Xeroc DC400 on Windows 7
but the result is no good, after instal the driver the pc can print but only for first time after that the printed paper cannot come out, then i search in google , go to the fuji xeroc site, but still no way, even i try to download Universal Driver for Printer Fuji Xeroc, the result is same only one time can print after that the printed paper cannot come out, i see this printer is the old model the driver only support on Windows 2000, even that it's can running on Windows Xp, Then after i call many time the technisian support from our suplier, the print can run on Windows 7, just a litle trick on setting port and Everything printed Well, Bravo to Technisian Support from Indonesian Fuji Xeroc, and now i share this to you all, even simple ,but for me its very usefull, bellow the setting PRINTER FUJI XEROC DC 400 On WINDWOS 7:

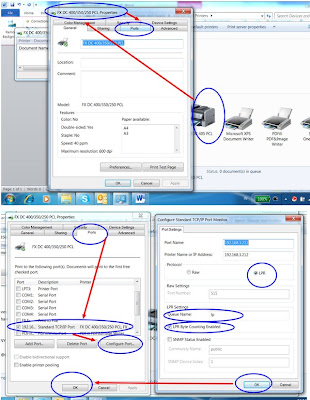
1. Right Klik The Printer Fuji Xeroc Dc 400
2. Klik Properties
3. On Properties Klik tab PORT
4. In Tab Port Klik the tick port and Klik configure
5. In Port Setting on Protocol choice LPR
6. In Port Setting on queue name Write LP
7. In Port Setting de tick LPR Byte counting Enable
8. Ok then OK


And For Running this setting the user must Have administrator right


Selasa, 12 April 2011

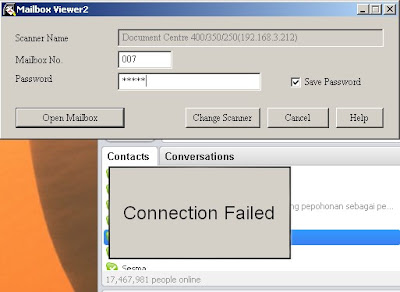
" Conection Failed" on Mailbox Viewer2


For download file scanned on Xeroc Machine DC400/350
we can use mailbox viewer2 aplication,but suddenly after
we put the username and password, it's come error messeage
" Connection Failed" it's mean we must allow firewall to
run mailbox viewer2 application, also this
program must allowed fxsslm12.exe
(C:Windows\system32. But don't forget to acces on Firewall
we must be as Administrator User.

From http://www.fijixeroc.co.jp

Setting IP on Xeroc Machine copy DC400/350


1. Klik Menu
2. KLik ▼ 2x "Maintenance Mode"
3. Klik ► for select the "Maintenance Mode"menu
4. In "Maintenance mode" klik ▼ Till "protocol Setting"
5. Klik ► for select "Protocol Setting"
6. Klik ► for Select TCP/IP
7. Klik ► for select IP address
8. fill the number of IP Address
9. Klik Eject/Set
10.Klik ◄ untill came "Subnetmask" and Klik ►
11.Fill The number Of SubnetMAsk
12.Klik Eject/Set
13.Klik ◄ untill came "Gateway" and Klik ►
11.Fill The number Of Gateway
12.Klik Eject/Set
13.Klik Menu

Finish

Note: ► = For select the menu
◄ = For cameback to beginning menu
▲ = For Increase the number, or changeng the menu
▼ = For decrease the number, or changeng the menu


Setting IP on Xeroc Machine copy

Jumat, 25 Februari 2011

Reset Password at MYSQL on ubuntu Lucid


After one week, configure my lucid,and learn about how to instal LAMP i have problem when login to phpmyadmin, almost 3 day search the problem couse when i instal no password filled and many time i try the metode from any forum to forum to get login on phpmyadmin but still not succes. Finaly this day i can login to my phpmyadmin follow the step from help.ubuntu.com and below the step you can use for reset password root and change it with your new password.

1.Stop the mysql demon process using this command :
sudo /etc/init.d/mysql stop
2.Start the mysqld demon process using the --skip-grant-tables option with this command
sudo /usr/sbin/mysqld --skip-grant-tables --skip-networking &
3.start the mysql client process using this command
mysql -u root
4.from the mysql prompt execute this command to reset/update your password
SET PASSWORD FOR root@'localhost' = PASSWORD('password');
5.If you have a mysql root account that can connect from everywhere, you should also do:
UPDATE mysql.user SET Password=PASSWORD('newpwd') WHERE User='root';

note:
open your terminal first and copy the bold text to terminal from no 1 ~ 5 one by one
for item 5 dont forget change this word newpwd with your new password

many thanks to kecoa-ngamuk, user from kaskus forum who was write the link to
help.ubuntu.com