Minggu, 15 Desember 2019

Hostpot on Windows 7 & Whatsapp Using Proxy Connection

Gegara sinyal susah dikantor, yo wis ta bikin hostpot karo wifi nang windows 7 OS, wal hasil jalan.. karo tambahan aplikasi Drony dari Google App...matur suwun to  www.pcninja.us for setting Hostpot tanpa tambahan aplikasi di Windows 7 dan Tambahan aplikasi Drony agar Whatsapp bisa jalan di koneksi yang menggunakan Internet via proxy to jaydeeppatil.com dan berikut Copas caranya 
Hostpot on Windows 7
For Windows 7 users, here is a way to turn your laptop into a WiFi hotspot. Note that you would need a compatible/ updated Windows 7 wireless network adapter driver. To date, brand names like Atheros, Broadcom and Realtek have been known to work. (Most of the newer laptops come with the above brands.)
1. Click Start (i.e. the Windows logo at the bottom left hand corner), type Cmd, right-click the Cmd.exe link and select “Run as Administrator”. If you don’t have that option, you aren’t an Administrator to your computer and you can’t proceed unless you’re setup as one.
2. Type the command below:
netsh wlan set hostednetwork mode=allow ssid=MyNetworkhere key=Password
and press [Enter]. Replace “MyNetworkhere” with the name you’d like to use for your new wifi network, and “Password” with a password of your choice.
3. While you are still at the command line, type
netsh wlan start hostednetwork
4. and press [Enter] to start the virtual adapter.
5. Now click Control Panel > Network and Internet > Network and Sharing Centre > Change Adapter Settings, right-click your internet connection and select Properties. Click the Sharing tab, check “Allow other network users to connect…”, choose your virtual Wi-Fi adapter.
That’s it! From now on, any WiFi capable device will able to pick up your laptop as a Wifi hotspot. Your WiFi network name (or SSID) will be what you defined above. Guess what, you’ve just learnt a trick to bypass having to purchase a wireless router for your house (with some minor downsides of course).
If you don’t want to share your laptop hotspot anymore:
Click Control Panel > Network and Internet > Network and Sharing Centre > Change Adapter Settings, right-click your internet connection and select Properties. Click the Sharing tab, uncheck “Allow other network users to connect…”, click  OK .
*Disclaimer: If done correctly, the above instructions should not cause problems with your computer. However, we will not be held responsible for any corrupted settings or if your operating system ends up being inoperable. Use this tip/trick at your own risk. Due to high volume of comments (asking for support and suggestions to why it is not working), we have made the decision that we will not respond to any support requests beyond this article. *
Whatsapp on proxy server: Drony App
Steps to configure Drony App to use whatsapp on proxy server
2. Now go to Wifi settings and hold the Wifi network which you intend to use.

3. Click ‘Modify Network’.
4.Check ‘Advanced Options’.
5.Choose ‘Manual’ in proxy settings.
6.Type ‘localhost’ in Proxy Hostname and put the port as 8020.

7. Now start Drony. Swipe left to goto Settings. Choose Wifi under Network. There you will see your Wifi network. Click on it. Set proxy type as ‘Manual’ . Move down and set the other Proxy type as ‘Plain’. Put your hostname, port, username and password. Put any Domain name.

8.Now go back to the home screen and Click on ‘Off’ to set it as ‘On’. Your apps will now route through the proxy automatically.

Kamis, 11 Juli 2019

User Profile become temporary Profile

Due to got Problem on deleted PDF File , i deleted user folder manually without remove or delet from System Properties, and suddenly when i re login again with user domain it's become Temporary user and all setting on those profile user cannot be saved after log off , Alhamdulillah after googling i Found many option how to solve it, and the first i found on Microsoft Community  https://social.technet.microsoft.com  finally can solve it, but full step i found on bellow post https://kb.uwplatt.edu. I say thanks to both of post, so i save it to my blog (Copy Paste)


WINDOWS 7 - WINDOWS LOADS WITH TEMPORARY PROFILE
How to restore the correct user profile after Windows starts logging in with a temporary user profile.
The first step, if the profile is not completely corrupt, is to rename the temporary profile registry key and revert the correct profile back.
  1. Log in with your temporary profile if your account has administrative rights or with the local administrator account.
  2. Start the registry editor and navigate to HKLM\SOFTWARE\Microsoft\Windows NT\CurrentVersion\ProfileList

  3. Look for the profile with the ".bak".  This is the CORRECT old profile.

  4. Rename the profile that does not have ".bak" by adding "_new" to the end.  You can really add anything to change the name of this profile, just be sure to rename the profile with the matching SID.  Next remove the ".bak" from the correct profile.


  5. Log off and then log back in with the profile that was problematic.  It is possible that Windows will undo everything you have just done and rename the profile again.  If this happens you can try running a Check Disk on the partition that contains the user profiles.  You will need to re-do all the steps above, run Check Disk, and restart.  If this doesn't correct the issue, you will need to remove the offending profile and recreate it.
To remove the domain profile and recreate it:
  1. Follow the above steps to clean up the registry, then log in as a local administrator.
  2. Navigate to the profile directory C:\Users\NetID and back up any data that is needed from the profile.
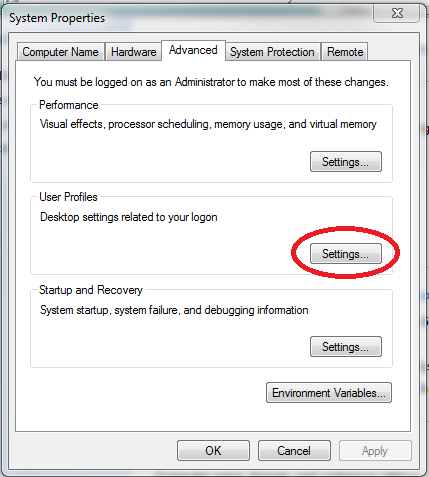
  3. Navigate to All Control Panel Items>>System>>Advanced system settings>>Settings


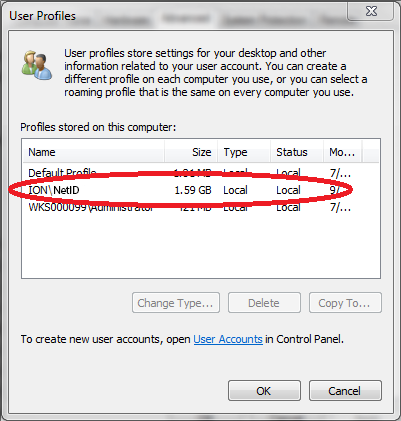
  4. Locate the corrupt profile ION\NetID and Delete this profile.


  5. Navigate to C:\Users and make sure the folder titled by the corrupt profile NetID is gone.  If not, delete this folder.
  6. Log out or restart and log back in using the previously corrupt NetID profile.  Windows will build a new profile for this NetID from the Default profile.
  7. Restore any data to the profile that was previously backed up.

Selasa, 09 Juli 2019

Batch File for Mapping Network drive (.bat)

Gegara seringnya network drive disconnect dan minta restore connection ...googling lagi deh krn lupa settingannya cara membuat .bat file untuk mapping network, Alhamdulillah dapet dari khofid.in ...btw ijin copas ya om...
Untuk Membuat Batch File nya, buka notepad dan copy perintah di bawah kedalam notepad jangan lupa save file namenya dengan extension .bat misal network.bat dan  save as typenya pilih All File (*.*)

Command yang digunakan sangat sederhana sekali :
net use x: \\IP_KOMPUTER\folder_sharing
atau jika membutuhkan atentikasi :
net use x: \\IP_KOMPUTER\folder_sharing /user:username passwd_user
Contoh :
net use x: \\10.10.10.2\musik
net use x: \\SERVER\musik
net use x: \\10.10.10.2\musik /user:administrator m0c0p4t
net use x: \\10.10.10.2\e$
net use x: \\10.10.10.2\e$ /user:administrator m0c0p4t
Keterangan :
x: : Adalah nama Drive yang akan digunakan untuk Mapping
e$ : Jika anda ingin mengakses drive E:\ pada komputer yang akan di Map
username : Username komputer yang akan di Map
passwd_user : Password user yang akan di Map

Senin, 08 Juli 2019

Removing or editing Credentials (Password) on XP,Vista and Windows 7

Gegara Ada user yang masih pake Windows sejuta umat, untuk credentials lupa access nya Alhamdulillah googling dapet dari interworks.com Thanks vroh...btw berikut cara nya ya..saya keep aja dimari...


To removed cached credentials

1. Click Start and select Run
2. In the Open field type “rundll32.exe keymgr.dll, KRShowKeyMgr”
3. Once the Stored Usernames and Passwords interface opens you can select any of the entries and select Properties to view the existing information
4. To remove a saved password you can select one of the entries and select Remove. A confirmation screen will appear. Click on OK and the account will be removed
5. You can add additional saved passwords as well by clicking on the Add button and entering the appropriate information
6. Repeat the steps above as needed to add, remove or edit saved passwords
7. When you are done using the interface click the Close button
That’s all there is to it. This is a great way to see if, while working on a machine, you’ve accidentally saved your credentials, as any username/password combinations in this list will survive a reboot, and still be available.